Wednesday, October 12, 2011
Force Internet Explorer compatibility view to be used for your web site
With Internet Explorer 8 and 9 you may have noticed some websites not working like they used to. It's been quite a while since the release of IE 8 so most of the major sites have probably caught up to this problem, but the easy fix is to setup the site to force IE8 and IE9 to use the compatibility view function with your site. You can do this through the use of a custom header, which is easy to setup in IIS. You can do it on other types of web servers too. The custom HTTP header to add is X-UA-Compatible: IE=EmulateIE7. This is supposed to only be acknowledged by IE, thus leaving any other browser functioning as it normally would. For instructions on how to do this in IIS 6 or IIS 7 or in a Web.config file, check out the Microsoft article here. For an Apache web server you can modify the httpd.conf file or include it in specific directories or pages. Microsoft outlines this process as well in a separate article that you can find here.
Monday, October 10, 2011
Can't uninstall McAfee Agent error 1714 or 1610
The environment I manage uses McAfee EPO for its antivirus needs, and I ran across multiple events in the application log with ID 11714 and 1002 on one of the machines. The event description was "Product: McAfee Agent -- Error 1714. The older version of McAfee Agent cannot be removed. Contact your technical support group. System Error 1610." I tried to manually uninstall the Agent and it kept asking for the MFEAgent.msi installer file, but that file was already in the location it was looking in. This meant the something was corrupt, so a little digging through the McAfee support forums led me to a quick fix using a registry hack.
1. Open up the Registry Editor (regedit.exe)
2. Navigate to HKEY_LOCAL_MACHINE\SOFTWARE\Classes\Installer\Products
3. Go to Edit->Find
4. Search for MFEAgent.msi
5. Delete the PackageName entry that is found with MFEAgent.msi as its value. It should be under something like HKEY_LOCAL_MACHINE\SOFTWARE\Classes\Installer\Products\2C12BAA2ADC498140ACEE56D6611F348\SourceList. The 2C12BAA2ADC498140ACEE56D6611F348 may vary between machines though, which is why you should search for it
6. Restart your computer
7. Reinstall the McAfee Agent
An alternative to searching in steps 3 and 4 would be to look in the Application event log at your event ID 1002. This will give you the exact registry path to the PackageName key you need to delete.
The McAfee forum post can be found here. Look on the second page for an entry by user SeaCat, who posted a long list of steps to fix the problem. Luckily, the first step of editing the registry was all that I needed to do, and from some of the other entries it looks like that also worked for some others.
Friday, September 9, 2011
Disable or enable an Active Directory account on a schedule
I know Active Directory has log on hours and account expiration, but what if you need to disable a user account at a specific time? I found this can be useful when an employee quits or is terminated because as long as I know in advance, I can schedule their account to be disabled and don't have to remember to do it manually. The trick is to use AD command line tools that are available on Windows Server through a batch file so it can be scheduled to run at a certain time. Here's how it can be done:
To see the Microsoft KB article outlining doing this with dsmod, click here
- Create a new text file and rename it to something.bat. This is the start of your batch script file that you'll schedule later on.
- Right-click your .bat file and select Edit. This should open the file in notepad so you can enter your command
- Enter dsmod user USER_DN -disabled (yes|no) into your batch file. To expand on what this means:
- dsmod user is required. This uses the directory services modify program built into your server,a and also says it will be a user change.
- USER_DN represents the DN of the user you want to disable within your Active Directory structure. Say your Active Directory domain is domain.com, your user is named Test User, and the user exists in the OU named DomUsers. Your USER_DN value would be CN=Test User,OU=DomUsers,DC=domain,DC=com
- -disabled is required because it defines which property for the user that you are changing
- (yes|no) means to select yes or no, whichever one you want to set disabled equal to
- Save your batch file
- Use Windows Scheduled Tasks to schedule the file. You can browse out and select it, then pick the schedule you want it to run.
Here are two basic examples of the command using the information above
To disable Test User the command is
dsmod user "CN=Test User,OU=DomUsers,DC=domain,DC=com" -disabled yes
And to enable Test User
dsmod user "CN=Test User,OU=DomUsers,DC=domain,DC=com" -disabled no
Notice that I put the USER_DN in quotes. This is because there are spaces. You're best off using quotes around the USER_DN regardless since it will work with the quotes regardless or spaces.
Also, if your user is buried in multiple OUs, just add them to the DN. If Test User had been in three tiers of OUs, such as a top-level named USA, a mid-level named MN, and a bottom-level named DomUsers, the USER_DN value would be CN=Test User,OU=DomUsers,OU=MN,OU=USA,DC=domain,DC=com
To see the Microsoft KB article outlining doing this with dsmod, click here
Friday, August 12, 2011
OS X Lion not creating a local home folder for network users
Update: 3/27/12
After a few months of relying on Snow Leopard, I had to get a new Macbook so this topic has come back up. I'm happy to report that the 10.7.3 update Apple released in early February appears to have fixed the mobile account issue this post was about. The only thing that still doesn't work is when disconnected from the network, domain users do not have admin rights on the machine even if they're in a group that Directory Utility has identified as an admin group on the machine. To get around this, check out my other post.
Update: 8/19/11
Apple released 10.7.1 yesterday, so I'm curious to see if it resolves these issues with network accounts. I'll have a chance to test it next week and will update this with what I find. If you're ready this and already tried it please leave a comment as to whether or not it works for you
Original Post
I use local home folders for the Mac users I manage, but the Macs are bound to Active Directory for the user accounts. In OS X 10.7 Lion this seems to be far from complete. First I couldn't get logged in with a network account, which required a workaround. Then after getting in, another error said the "The home folder for user xxxxxx isn't located in the usual place or cannot be accessed". This has worked fine in 10.4-10.6 but is now broken in 10.7. The problem appears to be related to OS X Lion having bugs with creating mobile accounts. By unchecking "Create mobile account", the home folder issue disappears. Supposedly I see a lot of talk of a 10.7.2 update fixing this problem, but since that update is in beta and not available to the general public that doesn't do much good. If you don't know where to go to uncheck the mobile account box, here's a walkthrough:
1. Open System Preferences
2. Go to User & Groups
3. Click Login Options in the lower left. You may have to authenticate first by clicking the lock icon in the lower left.
4. Under Network Account Server, click Edit
5. Select your domain, then click Open Directory Utility
6. Select Active Directory, then click the pencil to edit
7. Click to Show Advanced Options
8. Under User Experience you will see "Create mobile account at login". Uncheck this box
9. Click OK
10. Close your windows
11. Reboot and log in like normal
"Network accounts are unavailable" when logging into OS X Lion
Update: 3/27/12
I essentially gave up with the Mac Mini waiting on an update that solves the problem, and apparently 10.7.3 completely flew under my radar. I had read 10.7.2 still had issues, but in 10.7.3 one of the primary bugs Apple says they fixed is authentication with directory services. I had to get my first new Mac in a while this past weekend and was going to back rev it to run Snow Leopard, which turns out to be a pain. If you're looking to do it, check this article. Essentially you need a second Mac running Lion in order to use Target Disk Mode to install Snow Leopard on the machine.
In the testing I did today after updating to 10.7.3, it appears that both mobile accounts and the network unavailable issue have been fixed. The network unavailable may still show up for a little bit, but it disappeared for me within a minute. Having mobile accounts working also makes it easier since after the first login the user won't need to wait for the network account availability to change.
Update: 8/19/11
Apple released 10.7.1 yesterday, so I'm curious to see if it resolves these issues with network accounts. I'll have a chance to test it next week and will update this with what I find. If you're reading this and already tried it please leave a comment as to whether or not it works for you
Original Post
If you use Active Directory user accounts with your Macs, you may run into this issue after upgrading or introducing OS X Lion. Hopefully Apple comes out with an update to fix it soon, but in the meantime there is a workaround. You can add a custom search path to the Authentication tab and that seems to work. Here's a walkthrough:
1. Open System Preferences
2. Go to User & Groups
3. Click Login Options in the lower left. You may have to authenticate first by clicking the lock icon in the lower left.
4. Under Network Account Server, click Edit
5. Select your domain, then click Open Directory Utility
6. At the top, select Search Policy
7. Under the Authentication tab you should see two paths: /Local/Default, and /Active Directory/YourDomain/All Domains, where YourDomain is a placeholder for the name of your domain name. Click the + to add another
8. You should see /Active Directory/YourDomain listed as an additional option. Select it and click Add
9. Move /Active Directory/YourDomain above /Active Directory/YourDomain/All Domains so it has a higher priority
10. Click Apply
11. Reboot and log in
Thanks to juiced2010 at macrumors.com for posting that the solution.
Thursday, August 11, 2011
Mac OS X 10.7 Lion scrolling is inverted
After having my first hands-on experience with Mac OS X 10.7 Lion, one thing I noticed right away is that Apple thought it was a good idea to try to change the way people use scroll buttons on mice. They've set the default to be inverted, so if you scroll down the screen moves up, and scrolling up the screen moves down. I I'd guess this is because of their new swipe gestures to control your computer, but for someone like me who likes a two-button mouse it makes scrolling seem backwards. It's a simple fix though if your preferences are the same as mine:
1. Open System Preferences
2. Go to Mouse
3. Uncheck the box at the top that says "Move content in the direction of finger movement when scrolling or navigating"
4. Close System Preferences
1. Open System Preferences
2. Go to Mouse
3. Uncheck the box at the top that says "Move content in the direction of finger movement when scrolling or navigating"
4. Close System Preferences
Thursday, July 14, 2011
"Security log on this system is full" error when logging in
If you're logging in to a Windows XP or Windows Server 2003 machine and you notice this message, it's a really simple fix assuming you have access to an admin account on the machine. If not, you won't be able to login until it gets resolved, so contact an admin. Here's how to fix it:
1. Login using an account with admin privileges on the machine in question
2. Right-click My Computer, then go to Manage
3. Go to Computer Management->System Tools->Event Viewer
4. Right-click on Security and select Properties
5. In the Log Size section, do one of the following:
1. Login using an account with admin privileges on the machine in question
2. Right-click My Computer, then go to Manage
3. Go to Computer Management->System Tools->Event Viewer
4. Right-click on Security and select Properties
5. In the Log Size section, do one of the following:
- Increase the maximum log size. This will avoid the error message until your log reaches the new maximum, but you won't lose record of any security log events
- Select Overwrite events as needed. This will maintain the log up to the maximum size, and then delete the oldest events when it needs more space
- Click the Clear Log button in the lower right. This will wipe out all records in your security log
6. Click OK
That takes care of the problem. You'll want to make sure to choose the best option for what you'd like to accomplish, and can use a combination such as increasing the log size and overwriting events as needed.
Wednesday, June 22, 2011
OS X Disk Utility restore failed "Must be imagescanned..." error
While trying to image some Macbook Pros I ran into a problem restoring the prepared image onto the Macbooks. Disk Utility said the image file needed to be imagescanned in order to continue. I didn't know what this meant, but luckily this turned out to be something very simple. If you get this error select your image file you plan to restore, then go to Images->Scan Image for Restore.. in the top menu bar. That will run a quick check on your image file and allow you to restore it once the scan is finished.
Wednesday, May 11, 2011
Turn Fn or function key lock on or off on newer HP laptops
Update 12/8/2020:
While this post is over 9 years old at this point, I did run across a similar issue with the Fn keys being needed on a new HP Probook 450 G5. I'm not sure if the BIOS setting mentioned below still exists, but you can enable the Fn lock to get at your F1-F12 keys on that device by holding down the Fn key and then pressing the left shift key and releasing both at the same time.
Original Post:
1. Turn on the computer
2. Press F10 as soon as you see the HP or Compaq splash screen. This should take you into the BIOS
3. Once the BIOS settings load, go to System Configuration using the arrow keys
4. Press the down key to get to Action Keys
5. Press F5 or F6 to toggle between Enabled/Disabled. Enabled will change the brightness or change volume, disabled will allow using F1-F12
6. Press F10 to save the settings and exit
Thursday, April 7, 2011
"File does not have program associated with it" when trying to run any application in Windows
Update 11/21/2011:
After receiving a comment regarding this not working in the Run As Administrator mode, I did a quick search and found a Microsoft FixIt post that has a fix it for me option. You can find that link here: http://support.microsoft.com/kb/950505. If you can get the automatic fixer tool to run then that should clear up your problem, otherwise this article also lists the manual steps you can use to clear it up.
Original Post:
I had a user bring in a personal machine today (running Vista) and ask why she couldn't open anything on her computer. Immediately I told her she was likely infected with something, and it turns out she was. I used Spybot and MalwareBytes Anti-Malware to clear the infection. If you're not familiar with adware removal, check out one of my early posts. Afterward she was left with an error when trying to open anything. It said "This file does not have a program associated with it for performing this action. Please install a program or, if one is already installed, create an association in the Default Programs control panel." For those of you who are more visual, it looked like the image below.

If you have this error don't bother with the Default Programs control. Instead, I found a Microsoft KB article that outlines the steps that worked for me, which you can find here. I used a slightly modified version, which is what I'll explain here. My version is specific to Vista and should work on Windows 7, but likely won't work for XP. If you have XP or run into problems with my method, feel free to check out the KB article for the official walkthrough. Or there's another KB article listed here.
1. Open My Computer and go to C->Windows
2. Find regedit.exe, right-click and choose Run As Administrator. This will open the registry editor
Be careful to only change what is listed below from this point forward. Any other changes to the registry could potentially screw up the computer and require an OS restore.
3. In the left-hand pane, navigate to HKEY_CLASSES_ROOT->exefile->shell->open->command. In my case the command key wasn't there so I had to create it. If you are missing command, right-click open, select New Key, then type command there. This will create the command sub-key for you to click on.
4. In the right-hand pane, double click on (Default) that is listed inside command
5. Change the Value data field to "%1" %* exactly like that. To be clear that is quote then percent then 1 then quote then space then percent then asterisk
6. Click OK
7. Close Registry Editor
Now you should be able to open your applications again.
Tuesday, February 15, 2011
Add custom field to tickets and email in osTicket 1.6
I recently installed osTicket 1.6 for our property management group to use and have need to make some customizations. One of those customizations was how to create a custom field and add it to the tickets so more data could be captured. While the instructions to do this are out there, they seem to be located in different spots, so I'm going to try to consolidate a few useful links here for you.
How to add the custom field to the form
Making a custom field usable within the email templates (this is my own posted solution)
Listing a custom field in the Open Ticket table on the staff page (this doesn't explain exactly how to show a custom field, but does list the steps needed to add a field to the staff Open Tickets view)
Show the custom field in the ticket info on the staff side
I don't remember where I found the instructions for how to do this, but it's pretty simple. Edit the /include/staff/viewtickets.php file and insert the following where you want the custom field to be displayed
fieldName
getFieldName()?>
Wednesday, February 9, 2011
Remove orphaned Windows installer files to free up space
Using Microsoft's msizap.exe utility, found in the Windows Standard Development Kit (Windows SDK), you can clean up orphaned installer files from your C:\Windows\Installers directory. I recently found 10GB of orphaned installers using this method on an XP Pro machine, and it was nice to free up that space for other uses. Here's how you check to see if you have any orphaned installers taking up unnecessary space on your machine. If you're not sure what is taking up the unnecessary space, check out my previous post which should help you track it down.
1. Download the Windows SDK from Microsoft
2. Install the Windows SDK
3. Go to Start->All Programs->Microsoft Windows SDK->CMD Shell
4. Type "msizap.exe G!" and press enter. This will search for and remove orphaned installer files without the need for you to enter anything else
5. Once it finishes, close the command prompt window and go back to what you were doing
Monday, January 17, 2011
Deploying Quicktime fails with "A newer version of Quicktime is already installed"
UPDATE 10/13/2011: iTunes 10.5 doesn't require Quicktime to run anymore, so hopefully this problem disappears, but if you're still having trouble this article should help. If this doesn't solve your problem you can also try using the Windows Installer Cleanup Utility. Microsoft pulled this from it's list of available downloads citing the potential for problems (so this is your warning), but MajorGeeks.com still hosts a copy and that's where the link above will take you. Download and install the utility, then run it and remove any references to Quicktime it finds. You may even find some other unneeded programs leftover that you didn't see in the Add/Remove Programs list. After removing the Quicktime entries try running your modified installer that you create using the directions below.
Original Post
I ran into this issue while trying to deploy iTunes using group policy. Luckily a little digging in the msi file led me to a quick fix through the use of a transform of the original msi. If you have an easier fix please share in the comments. In order to do this you'll need Orca (which you can get from here), or another MSI editor installed. This should work on a personal machine as well, but you likely don't have a Quicktime.msi file yet so you'll want 7-zip installed in this case. Here's what I did that worked for me
If you don't have a Quicktime.msi file, start here. Otherwise skip to step #3 if you already have it, whether through iTunes or as a standalone
1. Download Quicktime from Apple
2. Right-click the QuickTimeInstaller.exe file and select 7-zip->Extract to QuickTimeInstallere. This will create a folder named QuickTimeInstaller containing some files, one of which is the Quicktime.msi that you need.

3. Open Orca, then go to File->Open, and browse out to your Quicktime.msi file
4. In the Tables column on the left, find the entry named "InstallExecuteSequence" and click on it.

5. On the right-side, look for "PreventDowngrade" in the actions column. This should be set to 1. Change this value to 0

6. Now save your newly modified .msi file
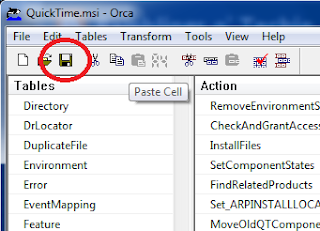
7. Close Orca and run the modified version of Quicktime.msi.
This should allow Quicktime to overwrite whatever other information it may be finding on your computer, which will bypass the error and get your Quicktime install back in working order.
Deploy iTunes 10.4 or 10.5 using group policy GPOs
UPDATE 10/12/2011: With yesterday's release of iTunes 10.5, iTunes no longer requires Quicktime. You can ignore all references to Quicktime below if you'll be deploying iTunes 10.5. You can still deploy Quicktime if needed in your environment, but it should be treated as a separate deployment
Original Post
Having an organization filled with iPhones, I end up managing a lot of iTunes installs. I've slowly been revoking admin privileges from users and have been providing network installation packages for most common software, but iTunes has been a bit problematic. After finding a couple of useful articles this past weekend, I decided to write my own with the steps I used to finally have a successful deployment of iTunes. The particular version of iTunes I'm deploying is 10.1.1.14, for both 32-bit and x64 Windows (XP, Vista, and 7). During the deployment I'm also stripping out Apple Software Update and Bonjour because they're not needed for anything we do.

2. This will extract the .exe file into a folder called iTunesSetup in the same location. This folder will contain the .msi files you will need. Go into the iTunesSetup folder


4. Now you need to fire up Orca and edit all four .msi files to use the language you need. According to the guides I read you can do this in the GPO, but that didn't work for me so I'd suggest doing it in both places. Start Orca, then go to File->Open, and open iTunes.msi.
5. Once the .msi opens, go to View->Summary Information... This will be where you eliminate all unneeded languages

6. In the Languages box, delete all but the language you need. US English is 1033, which is the only language code I would leave in the box. To lookup other language codes, please check out this MSDN article. Use the value in the HexLCID Dec column. Once you're done click OK

7. Save the .msi file.

8. Repeat steps #4 through #7 on the remaining three .msi files (AppleApplicationSupport.msi, AppleMobileDeviceSupport.msi, and Quicktime.msi).
If you want to install Bonjour and Apple Software Update you'll want to skip down to step #12. However, I'm going to guess since you're going through the trouble of deploying this you don't need them either.
9. Reopen iTunes.msi with Orca and go to Transform->New Transform

10. In the Tables column to the left, scroll down and click on "caPackage". In the right-hand window, right-click and select Drop Row on both AppleSoftwareUpdate and Bonjour. This will put a line through them to show that they will be removed.

11. Using that same idea go to LaunchCondition and drop the row with condition NOT BNEWERPRODUCTISINSTALLED. To auto-accept the license agreement go to the Property table and change the property IAcceptLicense to Yes. Also, under the Property table change property SCHEDULE_ASUW to 0. ASUW is the Apple Software Update service, and setting it to 0 shuts that off. There are some other optional settings you can add to your iTunes transform if too if you'd like. If you do not want shortcuts added to the desktop, go into the Component table and change the condition of component iTunesDesktopShortcuts to DESKTOP_SHORTCUTS="0". That's the only other one I have, but you can search Google for more if you want to try to change other settings too.
12. Once you have your changes to the installer all set up, go to Transform->Generate Transform. Name your transform file and save it. I suggest naming it iTunes.mst and saving it in the iTunesSetup folder with all the msi files, but that's up to you.

13. Repeat steps 9, 11, and 12 (skip 10) on AppleApplicationSupport.msi and AppleMobileDeviceSupport.msi to create transforms for each of them. You only need to do the first two things from step 11 though (drop NOT BNEWERPRODUCTISINSTALLED and change IAcceptLicense to yes).
13. Now you're ready to start creating GPOs. Copy the .msi files and your .mst transform files out to your software deployment share on the network
14. Login to the computer you're going to use to create your GPOs. You'll need a separate GPO for each .msi because they need to be installed in a particular order. Go ahead and create your four GPOs now. If you don't already have it, Group Policy Management console is really useful when you have multiple policies to manage. It's also what I'll be using in the directions
15. In the iTunes GPO, add your software package making sure to select Advanced when given the Assigned, Published, or Advanced options
16. You can set the software deployment settings however you'd like, except for the following. Go to the Deployment tab and click on the Advanced button. Check the box for "Ignore language when deploying this package", and also uncheck "Make this 32-bit X86 application available to Win64 machines" (if it's there)

17. Make sure to include your transform iTunes.mst to eliminate Bonjour and Apple Software Update. You have to do this with the initial package configuration, or else you have to recreate it. Go to the Modifications tab, click Add, then browse out to your iTunes.mst file.

18. That's it for iTunes.msi, as long as you configured the other settings to however you want them. Now you have to repeat steps 14 and 15 for your other three .msi files, making sure to tell the packages to ignore the languages. For Quicktime.msi and AppleApplicationSupport.msi, leave the box checked for "Make this 32-bit X86 application available to Win64 machines" since they don't have separate x64 versions. Make sure it's unchecked though for both iTunes and AppleMobileDeviceSupport.
19. Once you have your GPOs setup all that is left is to order them properly. They must be installed in a particular order, which is:
a. AppleApplicationSupport
b. AppleMobileDeviceSupport
c. Quicktime
d. iTunes
so your group policy order should look something like this
NOTE 9/22/11: I originally had an incorrect screenshot posted, but this one is correct. The link order determines the priority of that GPO's inheritance, so when you're installing items in a particular order you want it to be setup backwards because the highest link order will be the last thing to be installed. It does not install the highest link order first. Thanks to Matthew L. Christy for pointing this out in the comments below.

That's it for the important stuff, however there are some additional notes I'd like to make because I still ran into a few issues after this point. In case you run into them as well, I'd advise you to keep reading or bookmark this article so you can come back to it later. I hope this was useful
1. Getting an iPod service error during the iTunes install seems to be normal. I have safely ignored it and have not seen any adverse effect yet
2. Each time you deploy a new version of iTunes you will need to edit the msi files for the language, just like you did in steps #4-7. If you know of a way to save the language info in a transform let me know and I'll update the instructions
3. When deploying a new version, make sure to also apply your iTunes.mst transform to the new version of iTunes. You don't have to recreate the mst file every time, at least not until Apple changes the installed format and the caPackage table disappears
4. If you run into an issue installing Quicktime thats says there's already a newer version installed I have a workaround. First make sure Quicktime isn't installed, and if it is uninstall and try again. If it isn't installed and you get the error, then check out my other article for a workaround using another transform file
5. You can assign or publish all the msi files needed to deploy iTunes. If you publish them, which is what I did, make sure your users are aware of the proper order of installation.
6. To deploy both 32-bit and x64 versions, go through the same process but include both versions of iTunes.msi and AppleMobileDeviceSupport.msi through your GPOs. Using the "Make this 32-bit X86 application available to Win64 machines" check box allows you to control which one goes to which type of machine.
Original Post
Having an organization filled with iPhones, I end up managing a lot of iTunes installs. I've slowly been revoking admin privileges from users and have been providing network installation packages for most common software, but iTunes has been a bit problematic. After finding a couple of useful articles this past weekend, I decided to write my own with the steps I used to finally have a successful deployment of iTunes. The particular version of iTunes I'm deploying is 10.1.1.14, for both 32-bit and x64 Windows (XP, Vista, and 7). During the deployment I'm also stripping out Apple Software Update and Bonjour because they're not needed for anything we do.
First off, here are the helpful links I tracked down. Apple has an Enterprise Deployment guide for iPhones, which includes a little about deploying iTunes. You can find it here. I also found another paper about deploying iTunes in a corporate setting, and you can see that here. Neither included the full set of steps I needed to use, and I had to add a few of my own, so here is my own rendition of deploying iTunes.
To start you have to download iTunes, and you also need to have Orca (which you can get from here) or some other MSI editor. If you just want to deploy Quicktime the steps are very similar, but you can download the Quicktime installer. In order to use this guide, you'll also need 7-zip for extracting the .msi files from the .exe. It's not completely necessary since you can get the msi files from a temp folder, but it is quicker and 7-zip is a good tool to have anyway. From this point on I'm going to assume you have all three items downloaded, and both 7-zip and Orca installed on your machine. I'm also going to assume you're familiar with deploying software using group policy, and that you have a software deployment share setup somewhere on your network.
1. Right-click on iTunesSetup.exe and choose 7-zip->Extract to iTunesSetup. This will extract the .exe file into a folder called iTunesSetup in the same location. This folder will contain the .msi files you will need.

2. This will extract the .exe file into a folder called iTunesSetup in the same location. This folder will contain the .msi files you will need. Go into the iTunesSetup folder
3. The only files you need are AppleApplicationSupport.msi, AppleMobileDeviceSupport.msi, Quicktime.msi, and iTunes.msi. You can keep the others or delete them, whichever is your preference. Quicktime and AppleApplicationSupport are the same for both x32 and x64, so you won't need to change these at all. However, if you'll be deploying both x32 and x64 versions, you'll want to make sure to note AppleMobileDeviceSupport.msi and iTunes.msi with which version they're for because these are different depending on your architecture. If you're only deploying Quicktime, you only need AppleApplicationSupport.msi and Quicktime.msi from the folder that you end up with.
4. Now you need to fire up Orca and edit all four .msi files to use the language you need. According to the guides I read you can do this in the GPO, but that didn't work for me so I'd suggest doing it in both places. Start Orca, then go to File->Open, and open iTunes.msi.
5. Once the .msi opens, go to View->Summary Information... This will be where you eliminate all unneeded languages

6. In the Languages box, delete all but the language you need. US English is 1033, which is the only language code I would leave in the box. To lookup other language codes, please check out this MSDN article. Use the value in the HexLCID Dec column. Once you're done click OK

7. Save the .msi file.
8. Repeat steps #4 through #7 on the remaining three .msi files (AppleApplicationSupport.msi, AppleMobileDeviceSupport.msi, and Quicktime.msi).
If you want to install Bonjour and Apple Software Update you'll want to skip down to step #12. However, I'm going to guess since you're going through the trouble of deploying this you don't need them either.
9. Reopen iTunes.msi with Orca and go to Transform->New Transform

10. In the Tables column to the left, scroll down and click on "caPackage". In the right-hand window, right-click and select Drop Row on both AppleSoftwareUpdate and Bonjour. This will put a line through them to show that they will be removed.

11. Using that same idea go to LaunchCondition and drop the row with condition NOT BNEWERPRODUCTISINSTALLED. To auto-accept the license agreement go to the Property table and change the property IAcceptLicense to Yes. Also, under the Property table change property SCHEDULE_ASUW to 0. ASUW is the Apple Software Update service, and setting it to 0 shuts that off. There are some other optional settings you can add to your iTunes transform if too if you'd like. If you do not want shortcuts added to the desktop, go into the Component table and change the condition of component iTunesDesktopShortcuts to DESKTOP_SHORTCUTS="0". That's the only other one I have, but you can search Google for more if you want to try to change other settings too.
12. Once you have your changes to the installer all set up, go to Transform->Generate Transform. Name your transform file and save it. I suggest naming it iTunes.mst and saving it in the iTunesSetup folder with all the msi files, but that's up to you.

13. Repeat steps 9, 11, and 12 (skip 10) on AppleApplicationSupport.msi and AppleMobileDeviceSupport.msi to create transforms for each of them. You only need to do the first two things from step 11 though (drop NOT BNEWERPRODUCTISINSTALLED and change IAcceptLicense to yes).
13. Now you're ready to start creating GPOs. Copy the .msi files and your .mst transform files out to your software deployment share on the network
14. Login to the computer you're going to use to create your GPOs. You'll need a separate GPO for each .msi because they need to be installed in a particular order. Go ahead and create your four GPOs now. If you don't already have it, Group Policy Management console is really useful when you have multiple policies to manage. It's also what I'll be using in the directions
15. In the iTunes GPO, add your software package making sure to select Advanced when given the Assigned, Published, or Advanced options
16. You can set the software deployment settings however you'd like, except for the following. Go to the Deployment tab and click on the Advanced button. Check the box for "Ignore language when deploying this package", and also uncheck "Make this 32-bit X86 application available to Win64 machines" (if it's there)

17. Make sure to include your transform iTunes.mst to eliminate Bonjour and Apple Software Update. You have to do this with the initial package configuration, or else you have to recreate it. Go to the Modifications tab, click Add, then browse out to your iTunes.mst file.

18. That's it for iTunes.msi, as long as you configured the other settings to however you want them. Now you have to repeat steps 14 and 15 for your other three .msi files, making sure to tell the packages to ignore the languages. For Quicktime.msi and AppleApplicationSupport.msi, leave the box checked for "Make this 32-bit X86 application available to Win64 machines" since they don't have separate x64 versions. Make sure it's unchecked though for both iTunes and AppleMobileDeviceSupport.
19. Once you have your GPOs setup all that is left is to order them properly. They must be installed in a particular order, which is:
a. AppleApplicationSupport
b. AppleMobileDeviceSupport
c. Quicktime
d. iTunes
so your group policy order should look something like this
NOTE 9/22/11: I originally had an incorrect screenshot posted, but this one is correct. The link order determines the priority of that GPO's inheritance, so when you're installing items in a particular order you want it to be setup backwards because the highest link order will be the last thing to be installed. It does not install the highest link order first. Thanks to Matthew L. Christy for pointing this out in the comments below.

That's it for the important stuff, however there are some additional notes I'd like to make because I still ran into a few issues after this point. In case you run into them as well, I'd advise you to keep reading or bookmark this article so you can come back to it later. I hope this was useful
1. Getting an iPod service error during the iTunes install seems to be normal. I have safely ignored it and have not seen any adverse effect yet
2. Each time you deploy a new version of iTunes you will need to edit the msi files for the language, just like you did in steps #4-7. If you know of a way to save the language info in a transform let me know and I'll update the instructions
3. When deploying a new version, make sure to also apply your iTunes.mst transform to the new version of iTunes. You don't have to recreate the mst file every time, at least not until Apple changes the installed format and the caPackage table disappears
4. If you run into an issue installing Quicktime thats says there's already a newer version installed I have a workaround. First make sure Quicktime isn't installed, and if it is uninstall and try again. If it isn't installed and you get the error, then check out my other article for a workaround using another transform file
5. You can assign or publish all the msi files needed to deploy iTunes. If you publish them, which is what I did, make sure your users are aware of the proper order of installation.
6. To deploy both 32-bit and x64 versions, go through the same process but include both versions of iTunes.msi and AppleMobileDeviceSupport.msi through your GPOs. Using the "Make this 32-bit X86 application available to Win64 machines" check box allows you to control which one goes to which type of machine.
Wednesday, January 5, 2011
SQL Execution Error when creating a view from a linked server in Management Studio
In my particular case, I'm using SQL 2005 SP4 to create a linked server to a SQL 2008 server. However, I know this happens in SQL 2008 as well. I was able to create linked servers without any problems in both SQL 2005 and SQL 2008, and I could query the tables on a linked server just fine, but if I tried to create a view using the Management Studio view creator I would get a SQL execution error that looks like this

In this case I was creating a view to a table on the linked server using [192.168.1.70].sqldb.dbo.tablename. For some reason when I tried executing or saving the view, the brackets surrounding my linked server were automatically getting removed. Luckily there is a workaround for this, which I found on stackoverflow.com. If you manually create the view within the query window, it will work. So what I did next was open a query window and entered the following
CREATE VIEW myView
AS
SELECT *
FROM [192.168.1.70].sqldb.dbo.tablename
GO
Then I ran that query and it was successful. Refreshing the list of views available showed the view "myView", and I was able to use it like normal. However, if I opened the view in the view designer, the brackets were still missing and it would throw the same SQL Execution Error as above.
Subscribe to:
Posts (Atom)